Feature Top (Full Width)

HOW TO REGISTER YOUR BUSINESS UNDER GST ?अपने बिज़नेस को जीएसटी के साथ रजिस्टर कैसे करे ?

Thursday, April 30, 2020


HOW TO REGISTER YOUR BUSINESS UNDER GST ?


GST को registration करने के लिए आप भारत सरकार की www.gst.gov.in पर जा सकते है यदि आपकी पहले से user id है तो existing user login पर click करे यदि नहीं है तो new user login पर click करे |


new user login पर click करते है तो आप यहां पर i agree to के आगे वाले box को click करके continue कर सकते है |


Continue करने के बाद यहा पर बहुत सारे segment दिए गये है हमे इनमे से हर segment मे से किसी एक को upload करना है वह जपग किसी भी format मे हो सकती है |


GST Registration Rules – जीएसटी रजिस्ट्रेशन के नियम

A. Mandatory Registration – अनिवार्य पंजीकरण

GST को समझने और जानने के बाद सबसे महत्वपूर्ण प्रश्न यह आता है कि किन्हें अनिवार्य रूप से GST Registration करवाना है और किन्हें नहीं| तो जीएसटी में रजिस्ट्रेशन के लिए सबसे मुख्य आधार है – आपके व्यापार की कुल वार्षिक बिक्री/Annual Turnover|

1 April 2019 से शुरू होने वाले सभी Business जिनकी वार्षिक बिक्री 40 लाख (कुछ उत्तर-पूर्वी राज्यों में 20 लाख) से अधिक हैं उन्हें अनिवार्य रूप से GST के अंतर्गत रजिस्ट्रेशन करवाना होगा और GST के नियमो के पालन करना होगा| इस नई GST limit में ध्यान रखने लायक बाते कुछ इस प्रकार है –

  • 40 लाख वाली लिमिट 1 अप्रैल 2019 के नए वित्तीय वर्ष से शुरू होगी|
  • यह लिमिट केवल Sale of Goods पर ही लगती है, Services के लिए यह लागू नहीं होती|
  • Inter State Supply होने पर भी यह limit लागू नहीं होती है|
इसके साथ ही निम्न को भी Mandatory GST Registration लेना होगा –
  • अनिवासी भारतीय (NRI) 
  • ई-कॉमर्स संस्थाए (E-Commerce)
  • ई-कॉमर्स ऑपरेटरों के माध्यम से वस्तुओं और सेवाओं की आपूर्ति करने वाली संस्थाएं|
  • टीडीएस के लिए पात्र व्यक्ति (TDS Deductor)

B. Voluntary Registration – स्वैच्छिक पंजीकरण

सामान्यत: अगर आपके व्यापार की वार्षिक बिक्री (Annual Turnover) 40 लाख/ 20 लाख से अधिक नहीं है तो आपको जीएसटी पंजीकरण करवाने की आवश्यकता नहीं है| लेकिन अनिवार्य ना होने पर भी अगर आप GST रजिस्ट्रेशन करवाना चाहते है तो आप स्वैच्छिक रजिस्ट्रेशन करवा सकते हैं|

इसमें एक बात ध्यान देने जरुरी है की अगर आप एक बार GST Registration करवा लेते है तो उसके बाद आपको भी अन्य की तरह GST के नियमो का पालन करना होगा| और आगे चलकर अगर व्यापार की वार्षिक बिक्री Threshold limit से कम भी हो जाती है तो भी कोई अंतर नहीं पड़ेगा| इसके साथ ही स्वैच्छिक जीएसटी रजिस्ट्रेशन से व्यवसाय को कई सारे लाभ (Benefits) भी मिलते है| जैसे –

  • इनपुट टैक्स क्रेडिट का फायदा मिलना|
  • बिना रोकटोक के Interstate Supply करना|
  • ई – कॉमर्स वेबसाइट के द्वारा व्यापार करने की आजादी|
  • वस्तुओं और सेवाओं के आपूर्तिकर्ता के रूप में कानूनी मान्यता प्राप्त होना|
 

Types of GST Registration

1. Regular – सामान्य रजिस्ट्रेशन

Regular Dealer के अंतर्गत वे सभी व्यापारी आते है जो सामान्य रूप से वस्तुओ और सेवाओ की सप्लाई करते है और जो किसी विशेष स्कीम या आधार के तहत (जैसे कम्पोजीशन स्कीम या Foreign NRI) आवेदन नहीं करते है| 

सरल शब्दों में सामान्य तौर पर वह Business जो अपने Goods and Services की Supply करते है हुए कोई दूसरी विशेष गतिविधि नहीं करते| ऐसे Business या व्यापार के लिए Regular Dealer के आधार पर GST Registration किया जाता है| व्यापारी अनिवार्य रूप से या स्वैच्छा से से इसके तहत GST Registration करवा सकते है|

2. Composition Scheme – कम्पोजीशन स्कीम (छोटे व्यवसायों के लिए सरल प्रक्रिया)

Composition Scheme को छोटे और तय बिक्री वाले व्यपारियो के लाया गया है, ताकि छोटे व्यापार के लिए GST की प्रक्रिया को और आसान बनाया| यह एक विकल्प है अगर व्यापारियों की वार्षिक कुल बिक्री 1.5 करोड़ से कम है वे कम्पोजीशन स्कीम के तहत GST Registration ले सकते है|

GST Rates in Composition  Scheme

Composition Scheme में हर तिमाही की टोटल सेल पर सीधे निम्न दरों से GST का भुगतान करना होता हैं| जहाँ Normal Scheme में सामान्य रूप से सेल पर 18% GST लगता हैं और ख़रीदे गए माल पर चुकाए गए GST की Input Credit मिल जाती हैं वही कम्पोजीशन स्कीम में सीधे सेल पर 1% या 5% दर से टैक्स लगता हैं और Input Credit नहीं मिलती हैं|

  1. Trader or Manufacturer – 1% GST (0.5% CGST + 0.5% IGST)
  2. Restaurants – 5% GST (2.5% CGST + 2.5% IGST)

Composition Scheme – Important Rules

  1. वे Input Credit के लिए क्लेम नहीं कर सकते|
  2. उन्हें एक Fixed Rate से अपने Turnover पर GST Pay करना होगा|
  3. वर्ष में Goods की सप्लाई के साथ अधिकतम 5 लाख तक की Services प्रदान की जा सकती है|
  4. जिन वस्तुओ पर GST नहीं लगता व्यापारी उस माल की सप्लाई नहीं कर सकते|
  5. Composition Dealer अंतर-राज्य आपूर्ति (Inter State Supply) नहीं कर सकते|
  6. Dealer को Reverse Charge Mechanism लेनदेन के तहत सामान्य दरो पर टैक्स का भुगतान करना होगा|
  7. जहाँ व्यापार हो रहा है वहा व्यापारी को दर्शाना होगा की वह Composition Scheme के तहत व्यापार कर रहा है|
  8. कम्पोजीशन स्कीम के तहत व्यापारी अपने कस्टमर से GST वसूल नहीं कर सकता| उसे अपनी जेब से ही GST भुगतान करना होगा, इस कारण उसे Tax Invoice की जगह Bill of Supply इशू करना होगा|
  9. जीएसटी के भुगतान में –  की गई आपूर्ति पर जीएसटी, रिवर्स चार्ज पर टैक्स और अपंजीकृत डीलर से खरीद का टैक्स शामिल होगा|
  10. इसमें डीलर को पुरे वर्ष के दौरान 4 Monthly Return File करने होंगे| जो हर तिमाही के बाद और अगले महीने की 18 तारीख को भरे जाएँगे| तिमाही रिटर्न में GSTR-4 दाखिल करना होता है, इसके अलावा अगले वित्तीय वर्ष के 31 दिसंबर तक एक वार्षिक रिटर्न GSTR-9A दाखिल करना होगा|

Who Can’t Opt Composition Scheme – कौन कम्पोजीशन स्कीम नहीं ले सकते

कम्पोजीशन स्कीम के तहत निम्न तरह की Supply को इसके फायदे नहीं मिलेंगे –

  • Restaurant से संबंधित सेवाओं के अलावा अन्य किसी भी सेवाओं की आपूर्तिकर्ता (Supply of  Services)|
  • आकस्मिक कर योग्य व्यक्ति (Casual Taxable Person) या अनिवासी कर योग्य व्यक्ति|
  • ई-कॉमर्स ऑपरेटर के माध्यम से माल की सप्लाई करने वाले व्यवसाय|
  • आइसक्रीम, पान मसाला, या तंबाकू के निर्माताओ|

3. Foreign non-resident taxpayer –

Foreign Non Resident Taxpayer यानी एक अनिवासी विदेशी करदाता, जिसमे कोई व्यक्ति या कंपनी हो सकती है जो किसी भी माध्यम से भारत के किसी भी स्थान पर माल या सेवाओं या दोनों की कर योग्य सप्लाई करने में लगा हुआ है, लेकिन व्यवसाय का कोई निश्चित स्थान नहीं है| उनके लिए GST Registration की एक अलग प्रक्रिया बनी होती है, जो उनके द्वारा पूरी की जाती है|

4. Input service distributor –

इनपुट सेवा वितरक (ISD) एक व्यवसाय है जो अपनी Branches द्वारा उपयोग की जाने वाली सेवाओं के लिए चालान प्राप्त करता है| यह Input Tax Credit को सभी Branches में वितरित कर देता है जहाँ सेवाओ का चलान काटा गया था|

5. Tax deductor

6. E-commerce operator

7. Government department & UN bodies


GST Registration ना करवाने पर पेनल्टी –

अगर GST Rules के अनुसार जीएसटी के दायरे में आने के बाद भी व्यापारी द्वारा GST Registration नहीं करवाया जाता है या टैक्स नहीं भरा जाता है या कम टैक्स भरने पर, ऐसी परिस्थिति में व्यापारी को Penalty भरनी होगी – GST Rules के अनुसार दोषी पाए जाने पर, टैक्स भुगतान नहीं करने या कम टैक्स भरने पर 10,000 या देय टैक्स की राशि का 10% जो भी ज्यादा हो का जुर्माना भरना होगा| सरल शब्दों में पूरा टैक्स भरने के बाद 10,000 रुपये न्यूनतम राशि का जुर्माना देना होगा|

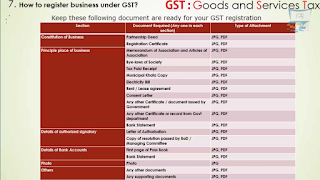
GST Registration के लिए Documents –

GST Registration के लिए विभिन्न प्रकार के करदाताओ को निम्न दस्तावेजो की जरुरत होगी –

#1 Individual/ Sole Proprietorship

  1. व्यक्ति का पैन कार्ड, आधार कार्ड और फोटो|
  2. वैलिड मोबाइल नंबर और ईमेल आईडी (email id)
  3. व्यापार के स्थान का सबूत (Proof of Place of Business)
  4. बैंक खाता की जानकारी (Valid Bank Account Details)

#2 Partnership/ LLP

  1. सभी सदस्यों का पैन कार्ड, आधार कार्ड और फोटो|
  2. व्यापार के स्थान का सबूत (Proof of Place of Business)
  3. बैंक खाता की जानकारी (Valid Bank Account Details)
  4. LLP होने पर – Copy of Board resolution & Registration Certificate of the LLP
    Proof of appointment of authorized signatory- letter of authorization

#3 Company

  1. कंपनी का पैन कार्ड|
  2. कम्पनी का पंजीयन प्रमाण पत्र (Registration Certificate)
  3. Memorandum of Association (MOA) और Articles of Association (AOA)
  4. सभी Directors का पैन कार्ड, आधार कार्ड और फोटो|
  5. कपनी के बैंक खाते की जानकारी (Company Bank Details)
  6. Address Proof
  7. Letter of authorization

#4 HUF

  1. HUF का पैन कार्ड|
  2. कर्ता का पैन कार्ड, आधार कार्ड और फोटो|
  3. व्यापार के स्थान का सबुत (Address proof) Own office/Rented office
  4. बैंक खाते की जानकारी (Bank details)

#5 Society or Trust or Club

  1. Society/Trust/Club का पैन कार्ड|
  2. उनका पंजीयन प्रमाण पत्र (Registration Certificated)
  3. Promoter/Partners का पैन कार्ड और फोटो|
  4. बैंक अकाउंट की जानकारी (copy of cancelled cheque or bank statement)
  5. Address Proof of Registered Office – (Own office/Rented office)
  6. Letter of authorization
 

जीएसटी रजिस्ट्रेशन कैसे करे – How to Apply for GST Number

GST Registration की पूरी प्रक्रिया Online है जिसके लिए आपके पास उपयुक्त Documents होने चाहिए और आप नीचे दी गई जानकारी के अनुसार GST Registration कर सकते है –

1. पहले gst.gov.in/registration पर जाए और login कर ले|

2. अब आपको Form A भरना होगा, जिसमे कुछ जानकरिया – PAN, Mobile Number और Email id आदि की जानकारी देनी होगी|

3. उसके बाद OTP द्वारा पुष्टि (Verification) करे| और आवेदन संख्या (Application Number) प्राप्त करे|

4. अब Application Number के द्वारा Form B भरे| जिसमे अपने बिज़नेस के अनुसार डाक्यूमेंट्स अपलोड करे|

5. अगले 3 कार्य दिवस (Working Days) के अन्दर अधिकारी GST – REG – 03 के दौरान अधिक दस्तावेजो की मांग भी कर सकता है| जिसकी पुष्टि आपको  GST – REG – 04 में करनी है|

6. अधिकारी के सहमत ना होने पर आपकी GST Registration Application खारिज की जा सकती है, जिसकी सूचना आपको GST – REG – 05 में दी जाएगी|

7. और सब कुछ सही रहने पर आपका GST Registration Application स्वीकार कर लिया जाएगा और आपको इसकी सूचना GST – REG – 06 में दी जाती है| यह पूरी प्रकिया में 7 वर्किंग दिनों का समय लग सकता है|

Easy Process of GST Registration – Charteredindia.com

GST Registration की प्रोसेस इतनी आसान भी नहीं है क्योंकि इसमें बहुत सारी बातों का ध्यान रखना पड़ता हैं जैसे किस तरह का रजिस्ट्रेशन लेना हैं, आपके Products/Services से संबधित HSN Code कौनसे लगेंगे, आपके Area का Jurisdiction कौनसा लगेगा आदि|अगर आपको इसकी पूरी जानकारी नहीं तो आपको अपना जीएसटी रजिस्ट्रेशन Expert की Help से ही करवाना चाहिए| पूरी नॉलेज नहीं होने के कारण आपको आगे प्रॉब्लम हो सकती और आपका रजिस्ट्रेशन रिजेक्ट भी हो सकती है| इसे Easy बनाने के लिए हमने आपके लिए Simple प्रोसेस बनाया है, जिसकी मदद से आपका GST Number प्राप्त करने में आसानी होगी –

  • आप अपने Mobile और Email id से हमें Contact कर सकते है और इस बातचीत के दौरान हमारे CAs और GST Experts आपको GST और Registration से जुड़ी पूरी जानकारी प्रदान करंगे और उचित सलाह देंगे|
  • इसमें हम आपको यह बताएँगे की आपके लिए कौनसा GST Registration सही रहेगा, कैसे आगे आपको महत्वपूर्ण रिकार्ड्स और खातों को मेंटेन करना है और कैसे उसके आधार पर GST Return भरे जाएँगे|
  • इसके बाद हम आपसे जरुरी Documents और अन्य जानकारिया प्राप्त करंगे जो GST Registration के लिए आवश्यकता होंगी|
  • उसके बाद आपको हमारी सर्विसेज चार्ज Online ही Payment करना होगा, जिसकी जानकारी आपको दे दी जाएगी| और
  • आपके भुगतान करने के बाद एक निश्चित समयावधि के बीच आपका GST Registration हो जाएगा|
  • इसके आलावा आगे की GST Process जैसे सही इनवॉइस जारी करना, रिकार्ड्स रखना, GST रिटर्न फाइल करना आदि आसान करने के लिए Expert द्वारा आपको पूरी जानकारी दी जाएगी और महत्वपूर्ण टूल्स (जैसे इनवॉइस फॉर्मेट, जीएसटी एक्सेल सॉफ्टवेर) प्रदान किये जाएंगे|
 

जीएसटी रजिस्ट्रेशन कैसे चेक करें – How to Check GST Registration Status

[Application Status] –


1. सबसे पहले GST Portal पर जाए|

2. उसमे Services में >>> Registration से >>> Track Application Status पर Click करे|

Check GST Reg. Application Status


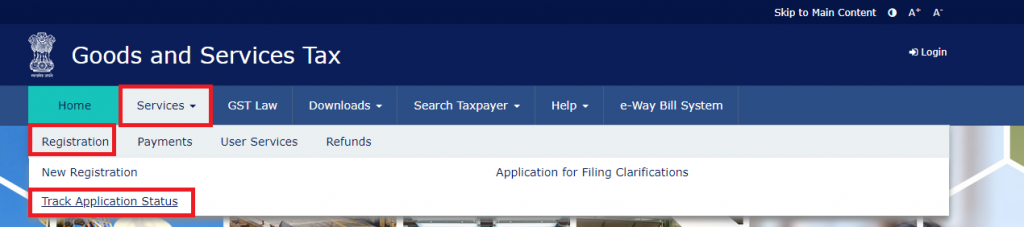
3. जिसके बाद आपको वहां ANR (Application Reference Number) Enter करके और CAPTCHA भर देना होगा

ARN Number

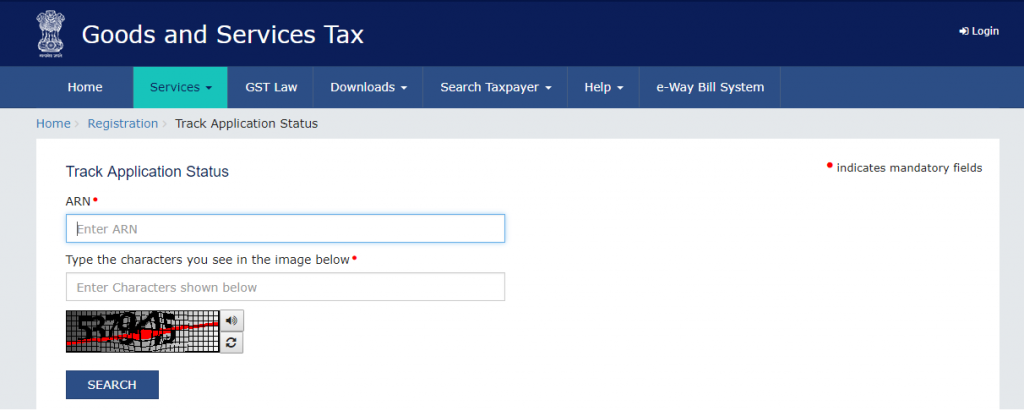
4. अंत में Search पर Click कर देना है और आपका GST Reg. Application Status आपके सामने होगा|

[Existing Status] –

1. पहले GST Portal पर जाए|

2. उसके बाद Search Taxpayer में >>> Search By GSTIN/UIN पर Click करे|

Check Existing Status

3. जिसके बाद आपको GSTIN Number भरना होगा और CAPTCHA को Enter करे|

GST UIN Status

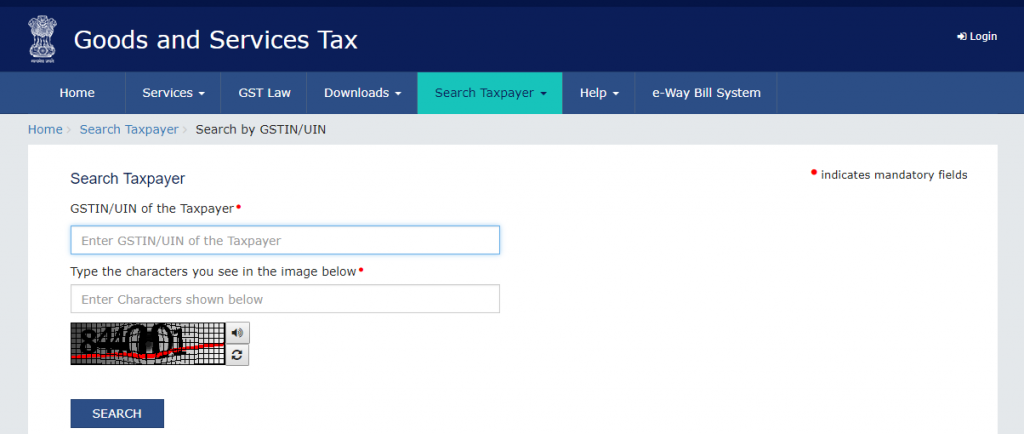
4. आखिर में Search पर Click कर देना है और आपको दिए गए GST Number का Existing Status मिल जाएगा|


जीएसटी रजिस्ट्रेशन सर्टिफिकेट कैसे डाउनलोड करें – Download GST Certificate

Download GST Certificate – [GST REG 6]

1. सबसे पहले GST Portal में Login करे|

2. उसके बाद Services में >>> User Services से >>> View/ Download Certificate पर click करे|

How to Download GST Certificate

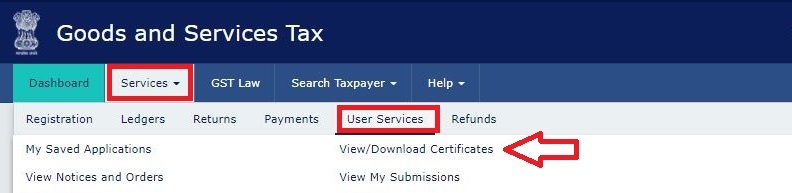
3.जिसके बाद आपको ‘Download’ के icon पर Click करना है|

Download REG 6

4. और आपका GST Certificate REG – 6 डाउनलोड हो जाएगा|


What is Bill wise Accounting?Bill by bill kya hai ?

Wednesday, April 29, 2020


What is Bill wise Accounting?


If we make an entry to a ledger that needs bill wise details, we have to give the details of the bill at the voucher entry itself. Where we can see the details of bills, specific credit periods and get the correct outstanding result [balance] of each ledger.

But when there are a lot of entries it becomes difficult to match a payment to an invoice. It is so that the details of creditors and debtors are maintained at the invoice level and called as Bill-Wise Accounting system.


Where do we find Bill wise Accounting feature in Tally.ERP 9?


We find this feature of Bill wise Accounting in Tally.ERP 9 under the Accounting feature head (F11)

    • Route to Access:
To enable the accounting features Go to Gateway of Tally > F11: Features > F1: Accounts.

We can now activate Bill wise accounting feature under the heading outstanding management features.
    • Bill wise Accounting:

Enable this option to display the option Maintain balances bill by bill in all ledgers created under sundry debtors and creditors. Where we enter the details of sales and purchases with the bill wise option activated, Tally.ERP 9 prompts us to identify the invoice with an appropriate reference number.


Types of Bill wise details in Tally.ERP 9

There are four types of bill wise detail.

New Reference

This is used at the time of passing sales and purchase entries which will later serve for Against reference entries to be passed under Sundry debtors and creditors ledger.

Against Reference

This reference is used when we pass receipt entries or payment entries against the references created at the time of passing of original entries such as sales and purchase.

Advance

This reference is used when any amount is received in advance for any services rendered or for any outward supplies of goods is made or when any amount is paid in advance for purchases to be made at the future date.

In other words, this type of bill wise detail is maintained where the nature of service or nature of product or terms of business demands advance receipts/ advance payments to be made and to track these when the business gets materialized at the time of raising of bill or invoice, these entries would serve as reference.

On Account

An interest receipt entry, interest payment entries uses these types of references. But apart from these, this type of reference is also used when we are unsure of as of against which bill the sum has been settled by the debtor.

So, all those types of entries are kept under this reference till the time it gets cleared as to which Invoice the sum relates to.

Benefits of maintaining Bill wise details in Tally.ERP 9

  • To easily maintain/generate outstanding reports of Receivables and Payables
  • To maintain & track Accounts Receivable and Accounts Payable based on every bill
  • The primary benefit of this capability is the speed and ease which is enabled by Tally.ERP 9
  • Helps in generating Age wise analysis report for receivables and payables

How to activate Bill wise Accounting in Tally.ERP 9?

It just takes few steps to activate this feature in Tally.ERP 9

Step 1:

To set Maintain Bill wise Details to Yes in F11 : Accounting Features window

Step 2 :

To create a Party (Ledger A/c) under Sundry Debtors / Sundry Creditors group

Step 3 :

To set maintain balances bill by bill to Yes for the parties during ledger creation                                                                                                                 

Step 4 :

From Gateway of Tally > Accounting Vouchers > Sales (F8) or Purchase (F9) accordingly and enter the transaction by specifying a Bill reference No. along with due dates for the amount to be received or paid in the Bill Allocations for screen (we can also break up the amount into multiple reference numbers with different due dates)

To generate various types of Bill wise summary report in Tally.ERP 9

Generally to view Receivables / Payables Reports, we have to proceed to Gateway of Tally > Display > Statement of Accounts > Outstandings > Receivables (to view due to the company). This report displays bill by bill outstanding for all the parties with the pending amount along with the due date.

Report Type

Description

Individual party wise – Bill wise outstanding

  • Select Ledger in the Outstandings menu
  • We will now get a report displaying bill-by-bill details of all outstandings for the concerned party along with the total outstanding amount

Group Outstanding report – Bill wise outstanding

To View Group Outstanding Report, select Group in the Outstandings menu and then select the specific group or sub group

Ageing analysis report – Bill wise outstanding

  • We can also view Ageing Analysis of Outstandings, by defining various ranges of periods and view outstanding across the specified time slabs
  • Such as 0 to 30 days, 30 to 45 days and 45 to 75 days and so on
  • To View Ageing Analysis Report , go to Gateway of Tally  > Display  > Outstandings  > Receivables or Payables
  • Select F6 (Age wise)
  • Specify Ageing Methods and the Periods

Bill wise accounting for Non – Trading accounts

Maintaining details of every bill for trading accounts is possible in Tally.ERP 9 using Bill wise Details. The same powerful and convenient feature is available for tracking and managing non- trading accounts like Loans, Advances and Installment Payments etc. as well.

Using this feature, business owners can easily track bills for expenses, any installments to be paid or loan amounts to be received. ‘Bill wise Details’ hence can be used to track the details of any already made or due payments and also to generate payables or receivables reports with minimum effort.

How to activate:

Go to Gateway of Tally > Press - F11: Accounting Features > Set ‘Yes’ to ‘Maintain Bill wise Details (for Non-Trading A/c s also).


Manufacturing with BOM(Bill of Material) | How to create manufacturing entry in tally hindi

Sunday, April 26, 2020

Create Bill of Materials for a Stock Item

 
A Bill of Materials is a list of constituent items along with quantity details that can be allotted for the manufacture of a certain product, by-product or likewise. This facilitates immediate reduction in stock of the item automatically. This process of listing the items that make up another item is made possible in Tally by enabling the Bill of Materials Facility.

Bill of Material (BoM) is created only for those items that are being assembled in-house. Therefore, you need to specify a BoM at the time of creating a Stock Item or while altering the stock item. For trading items, you do not need a BoM.

Bill of Material feature is useful for manufacturing organisations and can be set up through F12: Configure .


Setup Bill of Materials


● Go to Gateway of Tally > F12: Configure > select Accts/Inventory Info. 

● Set Enable component list details (Bill of Materials)? to Yes .


OR
 
● Go to Gateway of Tally > Inventory Info > Stock Items > Create. 
 
● Press F12: Configure (Stock Item Configuration) and set Enable component list details (Bill of Materials)? to Yes.


For a Stock Item you can create

● A Single BOM

● Multiple BOM

● Single/Multiple BOM with Type of Item.


Single Bill of Material for a Stock Item


Single BOM can be created for a stock item where you use standard set of inputs to manufacture finished goods.

Let us create a new Stock Item Television and specify BoM.


1. Go to Gateway of Tally > Inventory Info. > Stock Items > Create

2. In Stock Item Creation screen

o Enter the Stock Item Name , select the appropriate Stock Group and specify the appropriate Unit of Measurement in Unit field

o Set Component List : To create the component list required to manufacture the Finished goods enable this option to Yes


3. Press Enter to view Stock Item Multi Components (M BOM) screen

4. In Stock Item Multi Components (M BOM) screen

o Under Name of BOM specify component list Name - Standard and press enter to view Stock Item Components (BOM) screen


5. In Stock Item Components (BOM) screen:

o BOM Name : By default the BOM Name specified in Stock Item Multi Components (M BOM) screen will be defaulted and application will not allow to move the cursor to BOM Name field.

o Components of : In this field application displays the Name of the Stock Item for which the components are defined.

o Unit of manufacture : Specify the appropriate number of finished product that will be manufactured by using the components identified in the component list.

o Item : In this field identify the raw materials which are required to manufacture the finished goods

o Godown : If there are multiple Godowns or Locations, specify the storage location of the items from where the items will be used for manufacture.

Note: The godown option will be displayed only when Maintain multiple Godown feature is enabled in F11: Features (Inventory Features)

o Quantity : In this field mention the quantity of Raw Material required to manufacture the finished goods.

Observe to create 1 Television we require 5 different inputs . The Quantity of inputs consumed to manufacturer finished goods is 1 each of 5 different inputs.


o Specify other required details in the stock item master and accept the screen.

6. Creating Manufacturing Journal for a Stock Item with Single Bill of Materials . All the manufacturing transactions can be accounted through a Stock Journal.

o To record manufacture of finished goods in Stock Journal - Alter the Voucher Type by setting the option Use as a Manufacturing Journal to Yes . Or

o Create a Manufacturing Journal under Stock Journal by setting the option Use as a Manufacturing Journal to Yes.

Note: Bill of Material should be created before accounting the manufacture of an item.

7. Go to Gateway of Tally > Inventory Vouchers

8. Select the button F7: Stk. Jrnl or press Alt + F7. If you have created a new voucher type Manufacturing Journal , a pop-up menu will be displayed with the options default Stock Journal and Manufacturing Journal.


Select Manufacturing Journal to view the Manufacturing Journal voucher creation screen

o Name of Product : Select the product which needs to be manufactured from the List of Items.

o BoM Name : In this field the BoM created for the stock item will be displayed automatically with one more option Not Applicable .

Note: The list of Raw materials required for the manufacture of finished goods will be displayed in Components (Consumption) side based on the BOM defaulted.

o Godown : Select the godown where you would like to place the produced goods.

Note: Godown option will be displayed only when Maintain multiple Godown feature is enabled in F11: Features (Inventory Features)

o Quantity : In this field specify the quantity of finished goods manufactured.

o Components (Consumption) : In this section the components required to manufacture the finished goods will be displayed automatically based on the components defined in the BoM.

Quantity of Raw material will be defaulted based on the quantity requirement defined in the BOM multiplied by the Quantity of finished goods manufactured. The completed Manufacturing Journal is displayed as shown


Multiple Bill of Material for a Stock Item


Multiple BOM can be created for a stock items where you use varying set of components to manufacture a specific finished goods based on the availability of goods or customer requirements.

The facility to create Multiple Bill of Materials for Stock Item has been provided in Tally.ERP 9 Release 3.0. Where you can create multiple BOM with different component list for a stock item & appropriate BOM can be selected in the manufacturing Voucher.

This feature will be useful where you are using different components to manufacture the same stock item based on the customer requirement

Example : Customer A wants Television to be manufactured with specific brand of Picture Tube . Where as other customers has not specified any such specifications. In this scenario ABC company needs 2 BOM, one for Customer A as per his component specification & other may be a standard BOM for all other customers.


To create multiple Bill of Material


1. Go to Gateway of Tally > Inventory Info. > Stock Items > Create

2. In Stock Item Creation screen:


o Enter the Stock Item Name , select the appropriate stock group and specify the appropriate unit of measurement in Unit field
o Set Component List : To create the component list required to manufacture the Finished goods enable this option to Yes and press Enter to view Stock Item Multi Components (M BOM) screen
o In Stock Item Multi Components (M BOM) screen, under Name of BOM specify component list Name - Customer A a nd press enter to view Stock Item Components (BOM) screen.
If BOM is specifically created for a specific customer/sale you can enter the customer or sale name in Name of BOM field to identify the BOM while recording manufacturing transaction.
o In Stock Item Components (BOM) screen: BOM Name : By default the BOM Name specified in Stock Item Multi Components (M BOM) screen will be defaulted and application will not allow to move the cursor to BOM Name field.
o Components of : In this field application displays the Name of the Stock Item for which the components are defined.
o Unit of Manufacture: Specify the appropriate number of finished product that will be manufactured by using the components identified in the component list.
o Item : In this field identify the raw materials which are required to manufacture the finished goods
o Godown : If there are multiple Godowns or Locations, specify the storage location of the items from where the items will be used for manufacture.
o Quantity : In this field mention the quantity of Raw Material required to manufacture the finished goods.


o Press Enter to save the Stock Item components for BOM - Customer A and to view Stock Item Multi Component screen
o In Stock Item Multi Component screen enter the second Bill of Material name- Standard in Name of BOM field
o In Stock Item Components (BOM) screen specify the Unit of Manufacture, Item, Godown and Quantity details as shown


3. Specify other required details in the stock item master and accept the screen.


Manufacturing Journal for a Stock Item with Multiple Bill of Materials

1. Name of Product : Select the product which needs to be manufactured from the List of Items.
2. BoM Name : In this field Tally.ERP 9 displays the BOM List for selection of BOM , as multiple BOM are created for the finished goods.


3. Godown : Select the godown where you would like to place the produced goods.


Note: Godown option will be displayed only when Maintain multiple Godown feature is enabled in F11: Features (Inventory Features)

4. Quantity : In this field specify the quantity of finished goods manufactured.

5. Components (Consumption) : In this section the components required to manufacture the finished goods will be displayed automatically based on the components defined in the BoM.


Quantity of Raw material will be defaulted based on the quantity requirement defined in the BOM multiplied by the Quantity of finished goods manufactured.


Single/Multiple Bill Of Material with Type of Item


In some of the manufacturing processes along with the finished goods, Co-Products or By-Products or Scrap may be produced.

In this scenario while defining the BOM for the Finished goods, you may want to identify the inputs which are consumed to manufacture Finished goods & the By-products /Co-Products/ scrap manufactured.

Now in Tally.ERP 9 Release 3.0, you can create the BOM by selecting & identifying the components as consumption, By-Product/Co-Product/ Scrap.

Let us take the case of manufacture of Sugar and create the BOM for the stock Item.

To create Bill of Material with Type of Item

1. Go to Gateway of Tally > Inventory Info. > Stock Items > Create .

2. In Stock Item Creation screen:
o Enter the Stock Item Name , select the appropriate Stock Group and specify the appropriate Unit of Measurement in Unit field.
o 2. Set Component List : To create the component list required to manufacture the Finished goods enable this option to Yes and press Enter to view Stock Item Multi Components (M BOM) screen.
3. In Stock Item Multi Components (M BOM) screen:
o Under Name of BOM specify component list Name as - Standard.

4. In Stock Item Components (BOM) screen,
o In F12: Configuration , enable the option Define Type of Component for BOM to Yes.


On enabling the configuration option Define Type of Component for BOM in Stock Item Components (BOM) screen a new column Type of Item will be displayed.
o BOM Name : By default the BOM Name specified in Stock Item Multi Components (M BOM) screen will be defaulted and application will not allow to move the cursor to BOM Name field.
o Components of : In this field application displays the Name of the Stock Item for which the components are defined.
o Unit of Manufacture: Specify the appropriate number of finished product that will be manufactured by using the components identified in the component list.
o Item : In this field identify the raw materials which are required to manufacture the finished goods
o Godown : If there are multiple Godowns or Locations, specify the storage location of the items from where the items will be used for manufacture.
o Type of Item : In this field select the appropriate type for the item selected.
o By-Product : Select this classification for the stock items which are produced as By-Product of finished goods
o Component : Select this classification for the Raw materials /inputs which are used or consumed for the production of finished goods.
o Co-Product : Select this classification for the stock items which are produced as Co-product of finished goods
o Scrap : Select this classification for the stock item produced as scrap in the process of manufacture of finished goods.


o Quantity : In this field mention the quantity of Raw Material required to manufacture the finished goods or the Co- Products/ By-Products /scrap manufactured.

Note: Cursor will not move to Rate (%) column when the Component Type selected is Consumption .

o Rate (%) : In this field you can specify the percentage of cost of components to be considered to determine the cost of production of Co-products/By-Products/Scrap .

Note: If the Component Type selected is Co-product/By-Product or Scrap , cursor will move to Rate (%) column to define the percentage of cost of production of Co-product/By-Product or Scrap.
The completed Stock Item Component (BOM) screen for Stock Item - Sugar appears as shown


Observe to manufacture Sugar, Sugar Cane & Lime are identified as Raw materials (Component) . Bagasse & Molasses are identified as By-Products .


Note: When the Manufacturing Journal is recorded to account the manufacture of Sugar using the above created BOM the stock items identified as Component will be displayed under Components (Consumption) section. The stock items identified as CoProduct/ByProduct or Scrap will be displayed under Co-Products/By-Products/Scrap section

o Press Enter to save the Stock Item components for BOM - Standard and to view Stock Item Multi Component screen. If required you can create the second BOM for the stock Item
o Specify other required details in the stock item master and accept the screen.

Manufacturing Journal for a Stock Item with single/Multiple BOM created with Component Type

In Manufacturing Journal voucher:

● Name of Product : Select the product which needs to be manufactured from the List of Items.
● BOM Name : In this field the BoM created for the stock item will be displayed automatically with one more option Not Applicable .
For Stock Item Sugar we have created only one BOM, hence that BOM is defaulted. If Multiple BOM are created application displays the BOM list for selection


Note: Based on the BOM selected
* The list of Raw materials required to manufacture finished goods will be displayed in Components (Consumption) side
*The By-products & scrap produced during the manufacture will be displayed under Co-Products/By-Products/Scrap side

The default of Raw Materials & Co-Products/By-Products/Scrap will be based on the Component Type defined in BOM.

● Godown : Select the godown where you would like to place the produced goods.

Note: Godown option will be displayed only when Maintain multiple Godown feature is enabled in F11: Features (Inventory Features)

● Quantity : In this field specify the quantity of finished goods manufactured.
● Components (Consumption) : In this section the components required to manufacture the finished goods will be displayed automatically based on the components defined in BoM.

Quantity of Raw material will be defaulted based on the quantity requirement defined in the BOM multiplied by the Quantity of finished goods manufactured.

● Co-Products / By-Products / Scrap : In this section the co-products/ by-products/scrap produced during manufacture of finished goods will be displayed automatically based on the components defined & Component Type defined in BOM

Quantity of Co-Products / By-Products / Scrap will be defaulted based on the quantity defined in the BOM multiplied by the Quantity of finished goods manufactured.
● % of Cost : In this field, the percentage specified in Rate (%) column for the By-products/Co-Products or scrap while creating BOM will be defaulted. The % of Cost will be considered to determine the cost of production of Co-products/By-Products/Scrap .